
Amigurumi Minibon Doll Making
Fabrication
First, let’s start by knitting the sleeves, let them stand on the edge. The baby will not be in the form of stitching, knitting completely, no sewing.
Arm (2 pieces)
We start with the tan rope.
- 6sc into mr
2.1inc, 5sc = 7sc
3.1inc, 6sc = 8sc
4.-20. (17 rows) 8sc
(We are not filling the arms.)
Leg (2 pieces)
We start with the tan rope.
- 6sc into mr
- (1sc, 1inc) * 3 = 9sc
3- 9. 9sc (7 rows)
We go on the green color rope. - (2sc, 1inc) * 3 = 12sc
11-14. 12sc
(We cut the rope on the first leg. On the second leg we continue without cutting.)
Body
We connect the two legs with 6 chains.
- 12sc to 1st leg, 6sc to chain, 12sc to 2nd leg, 6sc to chain = 36sc
16-23. (8 rows) 36sc
We go to the skin color rope.
24-29. (6 rows) 36sc - (4sc, 1dec) * 6 = 30sc
31-32. 30sc - (3sc, 1dec) * 6 = 24sc
34-36. 24sc - (2sc, 1dec) * 6 = 18sc
Meanwhile, we add arms.
38.5sc, we knit 4 loops from both the arm and body at the same time, we tie the arm to the body, 5sc, again we knit 4 loops from both the arm and the body with 4sc. = 18sc
39.5sc, we knit the outer loops of the arm 4sc, continue from the body 5sc, we knit the outer loops of the arm 4sc. = 18sc
We fill the body with fiber beads.
- (1sc, 1dec) * 6 = 12sc
- (2sc, 1dec) * 6 = 9sc
42-44. 9sc (3 rows)
In this section, we adjust and install the wire. It would be better if it was longer, especially in a baby girl, since there is a lot of thread on the head, it prevents it from bending. We wrap it with paper tape and with the help of a skewer, we make room for the wire to enter into our pre-filled baby and insert the wire. Its length is 14 cm. It would be good if you set the wire so that it is in the whole body and almost the whole head. After placing the wire, we fill the edges of the neck tightly so that there is no play.
Head
- (2sc, 1inc) * 3 = 12sc
- (1sc, 1inc) * 6 = 18sc
- (2sc, 1inc) * 6 = 24sc
- (3sc, 1inc) * 6 = 30sc
- (4sc, 1inc) * 6 = 36sc
- (5sc, 1inc) * 6 = 42sc
- (6sc, 1inc) * 6 = 48sc
- (7sc, 1inc) * 6 = 54sc
- (8sc, 1inc) * 6 = 60sc
54-65. 60sc (12 rows) - (8sc, 1dec) * 6 = 54sc
- (7sc, 1dec) * 6 = 48sc
- (6sc, 1dec) * 6 = 42sc
- (5sc, 1dec) * 6 = 36sc
- (4sc, 1dec) * 6 = 30sc
(We’re starting to fill the head.) - (3sc, 1dec) * 6 = 24sc
- (2sc, 1dec) * 6 = 18sc
- (1sc, 1dec) * 6 = 12sc
(We are completing filling the head.)
74.6dec = 6sc
We cover the head by collecting loops.
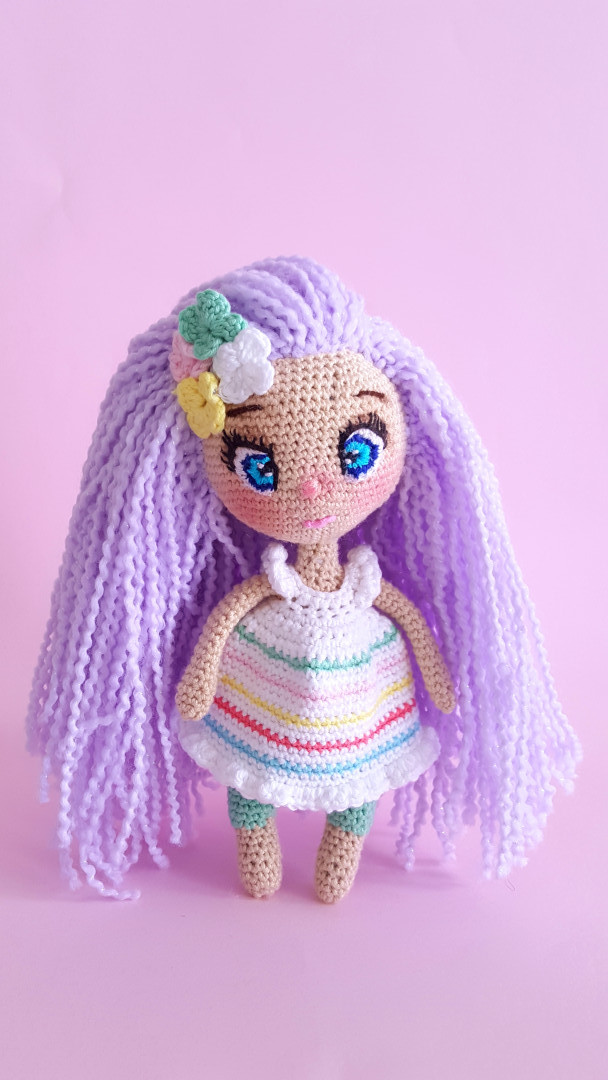
Our baby is finished.
We process the eye embroidery with 5 or 6 loops in between (You can check eye embroidery from the article How to Make Amigurumi Eye Processing?). We make eyebrows, nose and mouth. You can also make the hair as often and as long as you want. The finished version is about 18 – 20 cm.
Dress
We start with white color rope.
1.We pull 27 chains, start from the 2nd chain and make 26 hdc.
- Turn 1ch, 4sc, 4ch, jump 6 bat 6sc to 7th place, 4ch, 6 skip 7 bat 4sc.
3.Turn 1ch, 4sc, 4sc on 4ch, 6inc, 4sc on 4ch, 4sc = 28sc
4.1ch, 28sc
5.1ch, 1sc, 1inc = 42xsc
6.1ch, 42sc
(After this row, we will change color constantly. I will write the color at the beginning of the row, you can knit it by changing it accordingly.) - (Green) 2sc, 1inc = 56sc end of row combine with cc.
8-9. (White) 56sc (2 rows) - (Pink) 56sc
11-12. (White) 56sc (2 rows) - (Yellow) 56sc
14-15. (White) 56sc (2 rows) - (Coral) 56sc
17-18. (White) 56sc (2 rows) - (Blue) 56sc
20-21. (White) 56sc (2 rows) - We finish the dress by making a 3-hand railing, 1sc in each loop, completing the row and making cc. In this order, we also do the process on the arm ends.
The recipe belongs to me, if you want to knit and share it, if you share it with the #ozgedesignminibon hashtag, I will see the beauties made. Good luck with.