
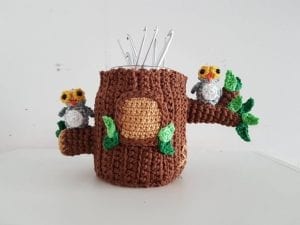
Amigurumi Pencil Case Making
Base
With Light Brown:
1: 6sc into the magic ring
2: 2sc in each loop (12)
3: (1sc, 1inc) * 6 = 18sc
4: (2sc, 1inc) * 6 = 24sc
5: (3sc, 1inc) * 6 = 30sc
6: (4sc, 1inc) * 6 = 36sc
7: (5sc, 1inc) * 6 = 42sc
Let’s knit 1 more in the same dimensions and combine them with a tight needle.
For the Pencil Case: Let’s start by pulling the chain measuring the height of the glass jar. And let’s do a frequent injection on it. Let’s do this process until we reach the width of the jar. Let’s sew the opposite ends of each other. After completing the body, let’s stitch the sole with the body.
Tree Branch – 1
1: 6sc into the magic ring
2: Each loop 2sc = 12sc by sinking into the back loops
3: 12sc by sinking into the front loops in the previous round
4-6: 12 DC
7: 4sc, inc to end of row = 15sc
Tree Branch – 2
1: 6sc into the magic ring
2: 6sc
3: 3x, v until end of row = 8sc
4-6: 8 DC
7: 2DC, v until end of row = 10DC
8 – 9: 10DC
10: 5DC, inc until end of row = 12DC
11: 12DC
Tree Branch – 3
1: 6sc into the magic ring
2- 5: 6 DC
Leaves
There will be 7 of them. Let’s draw 5 chains. 1sc on it, 2 hdc, 3 dc on the same place
Door
Let’s draw 5 chains. Let’s make 7 frequent needles by making 2 needles in the same place in the beginning and last chain. Let’s go back. Let’s make 9 frequent needles by doing the same in the next round. And let’s knit 9 rows of 9 frequent needles. Then let’s knit 1 round of frequent needles around it. And let’s sew it on the trunk.
Our pencil holder is ready.