
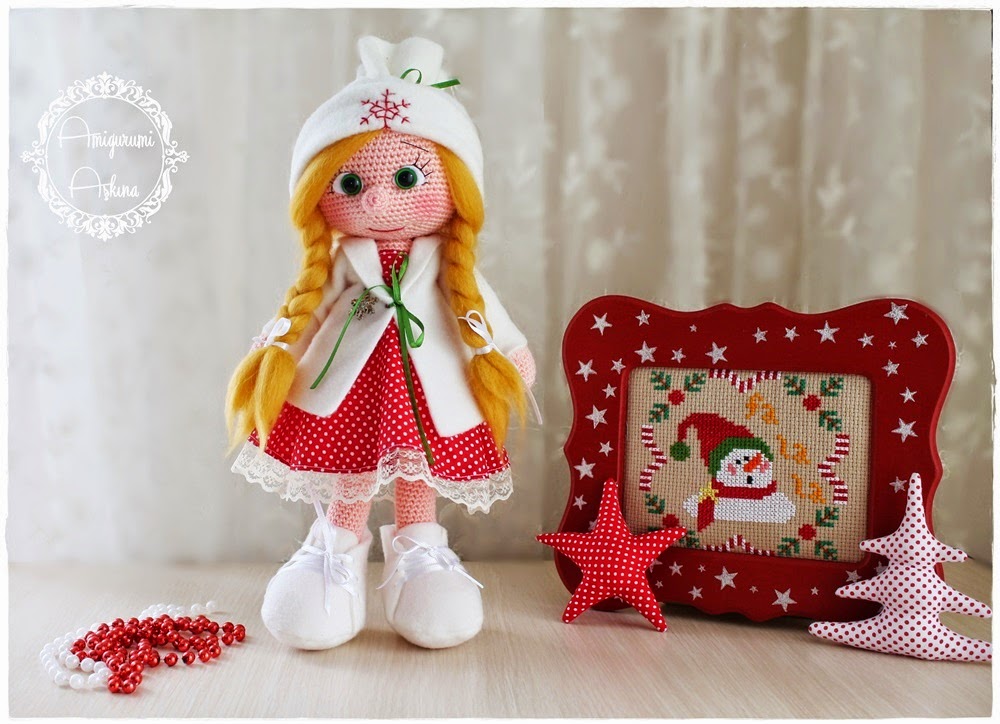
MAKING AMIGURUMI NEW YEAR BABY
What you need:
2,5 mm crochet hook
skin colored yarn
white yarn
2 x 12mm amigurumi safty eyes
black sewing thread
polyester filling
Explanation:
For our doll I used the crochet techniques single crochet, chain, increase and decrease. I think everybody knows how to
hold a hook. Techniques for Amigurumi you can find at the upper part of my blog in the category Amigurumi Teknikler.
You can start with any piece you want. I usually start with the head, going on with the other pieces.
To not getting confused with the rounds while crochet, put a contrast colored piece of yarn on the beginning of the round.
The numbers not in brackets shows you how often you have to repeat the number in the brackets. The number on the end of
any row shows you the count of single crochets in every round.
While crochet the parts of the doll we have to stuff them. Stuff the pieces before the opening geht to small to make it. When
you stuffed your piece you have to form the shape with putting the filling in the sides.
Before we start crochet our Amigurumi let us see how we start.
When I start an Amigurumi I chain 2 and start to fill the 2. chain from the hook with singel crochets. In the first Picture below you can
see the start with the chains, in the second picture making the single crochets and putting the contrast colored yarn.
Head
Start with skin colored yarn
- Chain 2 and make 6 single crochet in the 2. chain from hook ( Like in the pictures above )
- Single crochet in each single crochet, 6 times (12)
- (1 single crochet ,1 incr) repeat 6 times (18)
- (2 single crochet ,1 incr) repeat 6 times (24)
- (3 single crochet ,1 incr) repeat 6 times (30)
- (4 single crochet ,1 incr) repeat 6 times (36)
- (5 single crochet ,1 incr) repeat 6 times (42)
- (6 single crochet ,1 incr) repeat 6 times (48)
- (7 single crochet ,1 incr) repeat 6 times (54)
- (8 single crochet ,1 incr) repeat 6 times (60)
- (9 single crochet ,1 incr) repeat 6 times (66)
- (10 single crochet ,1 incr) repeat 6 times (72)
- – 26. 1 single crochet in each single crochet (72)
- (10 single crochet ,1 decr) repeat 6 times (66)
- (9 single crochet ,1 decr) repeat 6 times (60)
- (8 single crochet ,1 decr) repeat 6 times (54)
- (7 single crochet ,1 decr) repeat 6 times (48)
- (6 single crochet ,1 decr) repeat 6 times (42) Here we start put some filling in the head.
- (5 single crochet ,1 decr) repeat 6 times (36)
- (4 single crochet ,1 decr) repeat 6 times (30)
Before the opening gets to small for our fingers, we have put the eyes on. First we have to cut out some eyes out of felt like you can
see in the picture. Make a small hole in the felt with your scissors and put your safety eye in this hole. Fix the eyes between rows
22.-23. leaving 9 stitch space between them.
After put a little more filling in our head we continue with the decrease rounds. - (3 single crochet ,1 decr) repeat 6 times (24)
- (2 single crochet ,1 decr) repeat 6 times (18)
36.(1 single crochet ,1 decr) repeat 6 times (12)
Fasten off leaving a 20 cm tail for sewing
Nose
Start with skin color.
- Chain 2 and make 6 single crochet in the 2. chain from hook.
- 2 single crochet in each single crochet, repeat 6 times (12)
- 1 single crochet in each single crochet (12)
4.(2 sngle crochet, 1 dec) repeat 3 tmes (9)
Fasten off leavng 10 cm tal for sewng.
Body
Start wth whte. (If you want you can make t wth scn color)
- Chan 2 and sngle crochet 6 n the 2. chan from hook.
- 2 snle crochet n each sngle crochet, 6 tmes (12)
- (1 sngle crochet, 1 ncr) repeat 6 tmes (18)
- (2 sngle crochet, 1 ncr) repeat 6 tmes (24)
- (3 sngle crochet, 1 ncr) repeat 6 tmes (30)
- (4 sngle crochet, 1 ncr) repeat 6 tmes (36)
- (5 sngle crochet, 1 ncr) repeat 6 tmes (42)
- (6 sngle crochet, 1 ncr) repeat 6 tmes (48)
- (7 sngle crochet, 1 ncr) repeat 6 tmes (54)
- (8 sngle crochet, 1 ncr) repeat 6 tmes (60)
11.-18. 1 sngle crochet n each sngle crochet (60) - (8 sngle crochet, 1 decr) repeat 6 tmes (54)
- 1 sngle crochet n each sngle crochet (54)
- (7 sngle crochet, 1 decr) repeat 6 tmes (48)
22.-23. 1 sngle crochet n each sngle crochet (48) - (6 sngle crochet, 1 decr) repeat 6 tmes (42)
25.-26 1 sngle crochet n each sngle crochet (42) - (5 sngle crochet, 1 decr) repeat 6 tmes (36)
28.-30. 1 sngle crochet n each sngle crochet (36) - (4 sngle crochet, 1 decr) repeat 6 tmes (30)
32.-33. 1 sngle crochet n each sngle crochet (30)
In round 31. we change the color to scn color. Change the color lke n the pctures below
Contnue the decreases. 34. (3 sngle crochet, 1 decr) repeat 6 tmes (24)
35.-16. 1 sngle crochet n each sngle crochet (24) - (2 sngle crochet, 1 decr) repeat 6 tmes (18)
- (1 sngle crochet, 1 decr) repeat 6 tmes (12)
- 6 decr (6)
Hand and Arm
Start wth scn color.
1.Chan 8. Turn. Startng n 2. chan from hook make 6 sngle crochet, 3 sngle crochet n the next sttch, contnue on the other sde of
the chans. Sngle crochet 5, 1 ncr (16)
- (1 sngle crochet, 1 ncr) repeat 8 tmes (24)
3.-7. 1sngle crochet n each sngle crochet - 12 sngle crochet, (1 popcorn, make t lke n the pcture below), 11 sngle crochet (24)
For the finger (popcorn) make crochet 4 doublesttch in 1 stitch, but wait with last pulling through on each sttch until there are 5 stitches on hook.
Now pull through all 5 sttches (i.e. the 4 double crochet are crochet tog to 1 double crochet). And we’re gong on.
9.-10. 1 sngle crochet n each sngle crochet (24) - (2 sngle crochet, 1 decr) repeat 6 tmes (18)
- (4 sngle crochet, 1 decr) repeat 3 tmes (15)
13.-31. 1 sngle crochet n each sngle crochet (15) - (3 sngle crochet, 1decr) repeat 3 tmes (12)
Fasten off and leave a 20 cm tal for sewng
Foot and Leg
Start wth scn color
- Chan 10. Turn.
- In the 2. chan from make 2 sngle crochet, 7 sngle crochet, 4 sngle crochet n the last sttch. Contnue on the other sde of the
sttches. 7Sngle crochet, 2 sngle crochet n the last sttch. (22) - Contnue on the 1. sngle crochet from round 2.
(1 ncr) repeat 2 tmes, 6 sngle crochet, (1 ncr) repeat 6 tmes, 6 sngle crochet, (1ncr) repeat 2 tmes (32) - 1 sngle crochet, 1 ncr, 7 sngle crochet, (1 ncr, 1 sngle crochet) repeat 7 tmes, 1 ncr, 6 sngle crochet, 1 ncr, 1 sngle crochet
(42) - (6 sngle crochet, 1 ncr) repeat 6 tmes (48)
- (7 sngle crochet, 1 ncr) repeat 6 tmes (54)
- 1sngle crochet n each sngle crochet (54)
- 1 snlge crochet n each sngle crochet trough back loop only (54) lke n the pcture
9.-11. 1 sngle crochet n each sngle crochet (54) - 14 sngle crochet, 1 decr, 1 sngle crochet, 1 decr, 2 sngle crochet, (1 decr) repeat 8 tmes, 2 sngle crochet, 1 decr, 1 sngle
crochet, 1 decr1 10 sngle crochet (42) - 1 sngle crochet n each sngle crochet (42)
- 10 sngle crochet, (1 decr, 1 sngle crochet) repeat 8 tmes, 8 sngle crochet (34)
15.-16. 1 sngle crochet n each sngle crochet (34) - (2 sngle crochet, 1 decr) repeat 8 tmes, 2 sngle crochet (26)
- (1 decr) repeat 2 tmes, 22 sngle crochet (24)
- 1 sngle crochet n each sngle crochet (24)
- (2 sngle crochet, 1 decr) repeat 6 tmes (18)
21.-45. 1 sngle crochet n each sngle crochet (18) - (1 sngle crochet, 1decr) repeat 6 tmes (12)
Fasten off and leave a 20 cm tal for sewng.
Face Expression:
For making the eyelashes we use a long needle and sewing thread. We put the needle in the opening of the head and go out on a
proper place like in the picture. First we outline the upper eye ( picture 1, 2,3 and 4 ). Than we make the eyelashes. While making
the lashes we have to take car on one point. When putting the needle in like in picture 6 we have to go under the outline we made.
So we will secure the outline. Make the shape of the eyelashes like want to, I wanted to be them a little bit like Türkan Şorays’ but
you can make them more loose or firmly.
After the eyelashes without braking the yarn or with a new piece of yarn we making the eyebrows. The place you choose for the
brows is giving the face expression to your doll. Think about if you want you dolls face happy, sad, confused or innocent and make
the shape of the eyebrows matching. Mine is something like happy-confused. Make the eyebrows a little downwards if you want
them like mine. Last cut the yarn and make a knot
To give the face a natural smile expression and to form the line we have to make pits. Again we have to use a long needle. With scin
colored yarn we put the needle through the head like you can see on the pictures below. Than we take out the needle of the head
opening and pull both ends of the yarn to make the pits. Now mak a knot and push the ends in the head.
After making the shape of the mouth we need some color. To make this take a color of you choise and go with your needle through
the head opening and out where the 1. pit is. Than in the 2. pit and out trough the opening. Pull the mouth in place, make a not and
take the ends in the head. Now put some more filling in the head and it is finished.
Assembling the parts:
We start assembly head with body. But first we have to sew the nose on place. After you you know where you want to have the nose,
pin it on place and sew it on like you can see like in the pictures below. When you have fished sewing the nose get the yarn trough
the head out on one place and hide the yarn. You can see how to hide the yarn in the pictures for assembling legs.
We use the same sewing technique for all parts. We put the needle through a single crochet from the first piece, then through a
single crochet from the 2. piece. You can see how it works in the pictures. This is how you regularly sew the pieces together by hand.
Sew Head To Body:
Sew legs to Body and hide the yarn:
Before we sew on the legs we have to find the right place for them. After you have pinned them on place, sew them on. After you
sewed both legs to body make a knot in the yarn cut it a little and hide it like you can see in the pictures.
Sewing arms on:
Before sewing, hold your doll straight and find the right place. Pin the arms on body and sew them straight.
Sewing the clothes
We start with the dress. The mold for the dress I’ve made by my self, a very handy and simple design. It’s from 2 pieces. Put The
striped line on the mold to the fold line of the fabric and draw the lines. After you draw a 2. piece too, cut out the pieces out leaving
0,5cm – 1 cm seam allowance.
Sew the lace ribbon on the lower part like shown in the pictures below (3. picture). Turn your piece sew from the front too so it won’t
curl (5. picture).
Fold the upper edge of the upper part and sew the hem ( 3. picture). Ruffle the skirt part with a needle, tack and sew it to the upper
part (4.picture). In the back of the dress we only sew together together the lower part. We will sew the upper part later by hand.
The Coat
Folding our fleece fabric, put the striped line of the mold to the fold place of the fabric. Do the same with the sleeve. Cut the shapes
out leavng some seam allowance. ( on the body part we only leave allowance on the hood, arm cove and shoulders). Cut out the
sleeves the same way. Frst sew on the sleeves to body part, than tsew together he shoulders and the hood. Make a smal hole wth
you scssors n the front for a thn rbbon.
The Shoes
Put your mold on the fleece fabric and draw the shape. Leave some allowance on the 1. piece. On the 2. and 3. piece leave only at
the bottom some allowance. Find the middle point on the 1. and 2. piece ( fold them in the middle) put the right sides one to the other
and pin them together (3. picture.) Than find the middle point of the 3. piece put it together with the 1. pieces middle point, right sides
looking each other (5. picture). Sew the pinned pieces toghether with the sewing machine and turn the booty inside out (6. picture).
Make 3 little holes with you scisors in the front o the booty on both sides (like in picture 7). Get a thin ribbon through the holes
(picture 8) so it looks like shoelaces.
The Hat
Measure the head of your doll. This will be the width of the hat. The length is by you, I used 21×32 cm rectangle of fleece fabric. I’ve
folded the fabric in the front like on the pictures and pinned it. I sewed the side (striped line on the picture) with the machine and the
folded part by hand. Than take together the upper part and close it with a ribbon. Embroider a snowflake lke n the pcture shown
wth red yarn n the front and your hat s ready
The Har
Frst lay the felt on the head and gve t the shape you want. Pn the places you want to sew the har on. Take a thn nylon thread,
begnng n the front sewng to the back of the head. Weave the har and close t wth a nce rbbon or somethng else